onDraw
뷰가 화면에 보일 때는 onDraw 메서드가 호출된다.
예를 들어, 버튼의 경우에는 그림으로 된 아이콘이나 글자가 그 위에 표시 되려면
먼저 그 버튼을 담고 있는 레이아웃에 따라 버튼의 위치와 크기가 정해져야 한다.
그 후 다음 버튼의 모양과 그 안의 아이콘 또는 글자를 화면상에 그려주는 과정을 거치게 된다.
결국, 새로운 뷰를 클래스로 정의하고 그 안에 onDraw 메서드를 다시 정의한 후 필요한 코드를 넣어
기능을 구현하면 다른 모양으로 보이는 뷰를 직접 만들 수 있다.
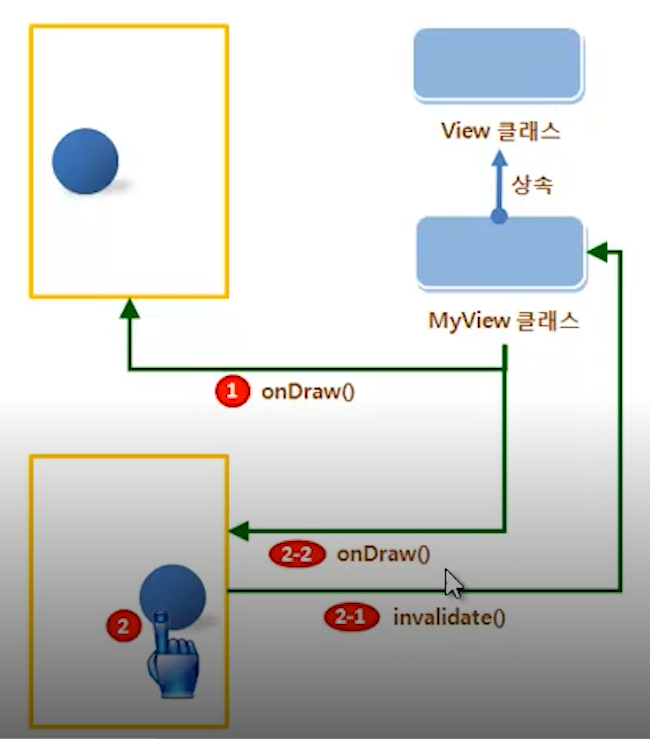
뷰가 화면에 보이기 전에 호출 되므로 onDraw() 메서드 안에서 원하는 모양의 그래픽을 화면에 그리면
그 모양대로 화면에 표현할 수 있다.
예제
새롭게 정의할 버튼을 위해 클래스를 하나 만든다
MyButton.java
1
2
3
4
5
6
7
8
9
10
11
12
13
14
15
16
17
18
19
20
21
22
23
24
25
26
27
28
29
30
31
32
33
34
35
36
37
38
39
40
41
42
43
44
45
46
47
48
49
50
51
52
53
54
55
public class MyButton extends AppCompatButton {
	// 필수 생성자
    public MyButton(Context context) {
        super(context);

        init(context);
    }
	// 필수 생성자
    public MyButton(Context context, AttributeSet attrs) {
        super(context, attrs);

        init(context);
    }

    private void init(Context context) {
        setBackgroundColor(Color.CYAN);
        setTextColor(Color.BLACK);

        float textSize = getResources().getDimension(R.dimen.text_size);
        setTextSize(textSize);
    }

    @Override		// 뷰가 그려질 때 호출되는 함수에 기능 추가하기
    protected void onDraw(Canvas canvas) {
        super.onDraw(canvas);

        Log.d("MyButton", "onDraw 호출됨");
    }

    @Override		// 뷰가 터치될 때 호출되는 함수에 기능 추가하기
    public boolean onTouchEvent(MotionEvent event) {
        Log.d("MyButton", "onTouchEvent 호출됨");

        int action = event.getAction();
        switch (action) {
            case MotionEvent.ACTION_DOWN:
                setBackgroundColor(Color.BLUE);
                setTextColor(Color.RED);

                break;
            case MotionEvent.ACTION_OUTSIDE:
            case MotionEvent.ACTION_CANCEL:
            case MotionEvent.ACTION_UP:
                setBackgroundColor(Color.CYAN);
                setTextColor(Color.BLACK);

                break;
        }
		// 화면을 다시 그려주기 위해 호출
        invalidate();

        return true;
    }

}
글자 크기를 조절하기 위해 XML 파일을 하나 만들어 준다.
/app/values/dimens.xml
1
2
3
4
<?xml version="1.0" encoding="utf-8"?>
<resources>
 <dimen name="text_size">16sp</dimen>
</resources>
새롭게 정의한 버튼을 등록하기 위해 acitvity_mani.xml을 수정한다.
1
2
3
4
5
6
7
8
9
10
11
12
13
<?xml version="1.0" encoding="utf-8"?>
<RelativeLayout xmlns:android="http://schemas.android.com/apk/res/android"
  android:layout_width="match_parent"
  android:layout_height="match_parent">

 <org.techtown.view.MyButton
  android:id="@+id/button"
  android:layout_width="200dp"
  android:layout_height="80dp"
  android:layout_centerInParent="true"
  android:text="시작하기" />

</RelativeLayout>
MyButton은 직접 정의한 위젯이므로 XML 레이아웃에 추가할 떄 패키지 이름까지 함께 넣어야 한다.
결과
