Volley 사용하기
Volley 라이브러리는 웹 요청과 응답을 단순화하기 위해 만들어진 라이브러리이다.
Volley를 사용하려면 먼저 요청(Request) 객체를 만들고 이 요청 객체를 Request Queue에 넣어주기만 하면 된다.
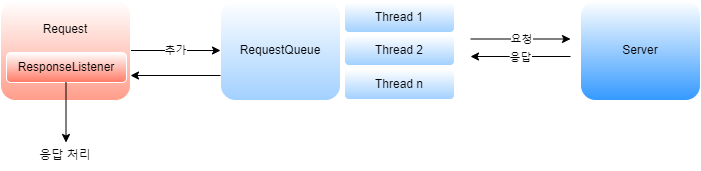
Volley 라이브러리의 가장 큰 장점은 스레드를 신경 쓰지 않아도 된다.
요청 큐가 내부에서 스레드를 만들어 웹 서버에 요청하고 응답 받는 과정을 진행하는데,
응답을 처리할 수 있는 메서드를 호출 할 때는 메인 스레드에서 처리할 수 있도록 만들기 때문이다.
예제
Volley는 외부 라이브러리이므로 build.gradle 파일에 정보를 추가해 줘야 한다.
(Module: SampleRequest.app)
1
2
3
4
5
6
dependencies {
		   ...

    implementation 'com.android.volley:volley:1.2.0'

	       ...
또한 인터넷을 사용하므로 매니페스트 파일에 INTERNET 권한을 추가하는 것도 잊어서는 안된다.
AndroidManifest.xml
1
2
3
4
5
6
7
8
<?xml version="1.0" encoding="utf-8"?>
<manifest xmlns:android="http://schemas.android.com/apk/res/android"
    package="org.techtown.myapplication">

    <uses-permission android:name="android.permission.INTERNET"/>

    <application
        android:usesCleartextTraffic="true"
ActivityMain.xml
1
2
3
4
5
6
7
8
9
10
11
12
13
14
15
16
17
18
19
20
21
22
23
24
25
26
27
28
29
30
31
32
33
34
35
36
37
38
39
40
<?xml version="1.0" encoding="utf-8"?>
<LinearLayout xmlns:android="http://schemas.android.com/apk/res/android"
    xmlns:app="http://schemas.android.com/apk/res-auto"
    xmlns:tools="http://schemas.android.com/tools"
    android:layout_width="match_parent"
    android:layout_height="match_parent"
    android:orientation="vertical"
    tools:context=".MainActivity">

    <EditText
        android:id="@+id/editText"
        android:layout_width="match_parent"
        android:layout_height="wrap_content"
        android:ems="10"
        android:inputType="textPersonName"
        android:text="사이트 주소 입력" />

    <Button
        android:id="@+id/button"
        android:layout_width="match_parent"
        android:layout_height="wrap_content"
        android:text="요청하기" />

    <ScrollView
        android:layout_width="match_parent"
        android:layout_height="match_parent">

        <LinearLayout
            android:layout_width="match_parent"
            android:layout_height="wrap_content"
            android:orientation="vertical" >

            <TextView
                android:id="@+id/textView"
                android:layout_width="match_parent"
                android:layout_height="wrap_content" />
        </LinearLayout>
    </ScrollView>

</LinearLayout>
MainActivity.java
1
2
3
4
5
6
7
8
9
10
11
12
13
14
15
16
17
18
19
20
21
22
23
24
25
26
27
28
29
30
31
32
33
34
35
36
37
38
39
40
41
42
43
44
45
46
47
48
49
50
51
52
53
54
55
56
57
58
59
60
61
62
63
64
65
66
67
68
public class MainActivity extends AppCompatActivity {
    EditText editText;
    TextView textView;

    static RequestQueue requestQueue;

    @Override
    protected void onCreate(Bundle savedInstanceState) {
        super.onCreate(savedInstanceState);
        setContentView(R.layout.activity_main);


        editText = findViewById(R.id.editText);
        textView = findViewById(R.id.textView);

        Button button = findViewById(R.id.button);
        button.setOnClickListener(new View.OnClickListener() {
            @Override
            public void onClick(View v) {
                makeRequest();
            }
        });

        if (requestQueue == null) {
	        // 요청 큐 생성
            requestQueue = Volley.newRequestQueue(getApplicationContext());
        }

    }

    public void makeRequest() {
        String url = editText.getText().toString();

        StringRequest request = new StringRequest(
                Request.Method.GET,
                url,
                new Response.Listener<String>() {
                    @Override
                    public void onResponse(String response) {
                        println("응답 -> " + response);

                    }
                },
                new Response.ErrorListener() {
                    @Override
                    public void onErrorResponse(VolleyError error) {
                        println("에러 -> " + error.getMessage());
                    }
                }
        ) {
            @Override
            protected Map<String, String> getParams() throws AuthFailureError {
                Map<String,String> params = new HashMap<String,String>();

                return params;
            }
        };

        request.setShouldCache(false);
        requestQueue.add(request);	// 요청 큐에 요청 객체를 넣어 줌
        println("요청 보냄.");
    }

    public void println(String data) {
        textView.append(data + "\n");
    }

}
사용자가 버튼을 클릭했을 때 요청 객체를 만들고 요청 큐에 넣어준다.
요청 큐는 이 액티비티에서만 사용하는 것이 아니라 앱 전체에서 사용하는 것이 일반적이다.
그래서 static 키워드로 클래스 변수를 선언한 후 할당했다.
실제 앱을 만들 때는 Application 클래스 안에 넣어두거나 별도의 클래스를 하나 만들어서 넣어 둘 수 있다.
String Request는 문자열을 주고 받기 위해 사용하는 객체이고 요청 객체는 StringRequest 클래스로 만들 수 있다.
요청 객체를 만들 때 4가지의 파라미터를 전달하는데 내용은 아래와 같다.
- GET, POST 요청 방식 지정
- 웹사이트 주소
- 응답 받을 리스너 객체 전달
- 에러가 발생할 때 호출될 리스너 객체 전달
위에서는 GET 방식을 사용했지만 POST 방식을 사용하면서 요청 파라미터를 전달하고자 한다면
getParams 메서드에서 반환하는 HashMap 객체에 파라미터 값들을 넣어주면 된다.
위에서는 파라미터가 없기 때문에 비워 뒀다.
요청 큐의 add 메서드로 요청 객체를 넣으면 요청 큐가 자동으로 요청과 응답 과정을 진행한다.
요청 객체는 cache 메커니즘을 지원하는데 만약 이전 응답 결과를 사용하지 않는다면
setShouldCache 메서드를 사용해 false로 설정하면 된다.
결과
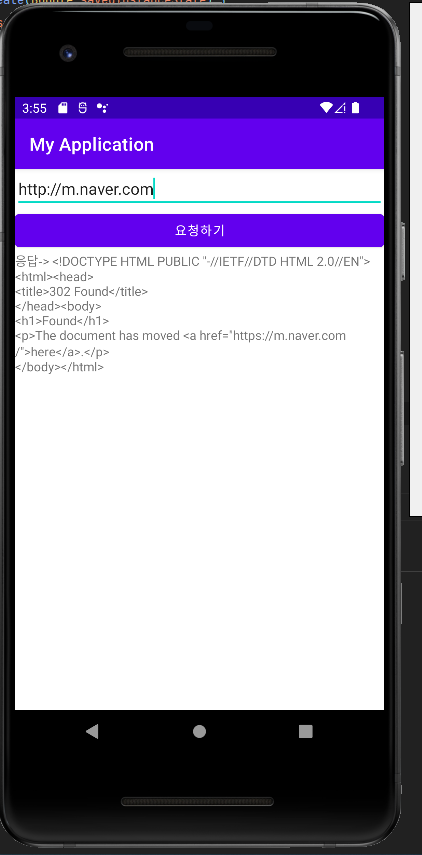
위처럼 스레드나 핸들러를 사용하지 않았는데도 웹 사이트 요청과 응답이 문제 없이 진행되는 것을 확인할 수 있다.