뷰 페이저
뷰 페이저는 손가락으로 좌우 스크롤하여 넘겨볼 수 있는 기능을 제공한다.
화면 전체를 뷰 페이저로 채운다면 좌우 스크롤을 통해 화면을 넘겨 볼 수 있고,
화면 일부분만 차지하고 있어도 그 부분에서 좌우 스크롤이 동작한다.
뷰 페이저 만들기
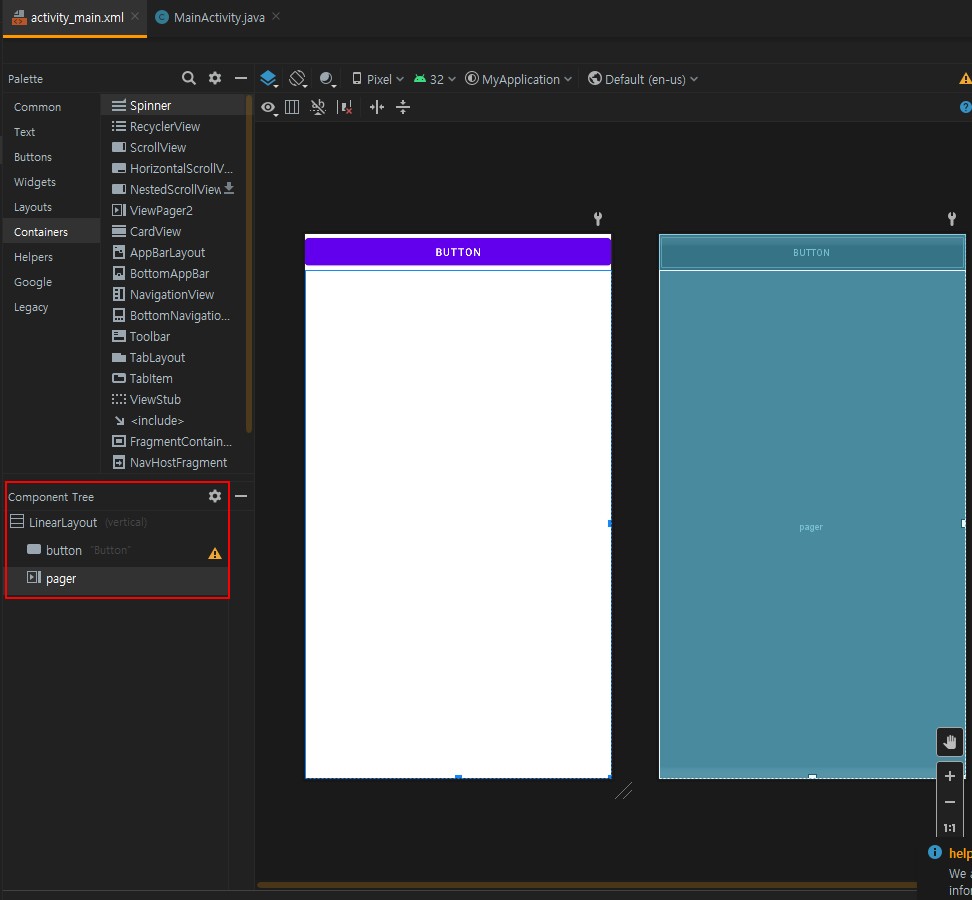
메인 액티비티 xml을 아래와 같이 설정
activity_main.xml
1
2
3
4
5
6
7
8
9
10
11
12
13
14
15
16
17
18
19
20
21
22
23
24
25
26
27
28
29
30
31
32
<?xml version="1.0" encoding="utf-8"?>
<LinearLayout xmlns:android="http://schemas.android.com/apk/res/android"
xmlns:app="http://schemas.android.com/apk/res-auto"
xmlns:tools="http://schemas.android.com/tools"
android:layout_width="match_parent"
android:layout_height="match_parent"
android:orientation="vertical"
tools:context=".MainActivity" >
<Button
android:id="@+id/button"
android:layout_width="match_parent"
android:layout_height="wrap_content"
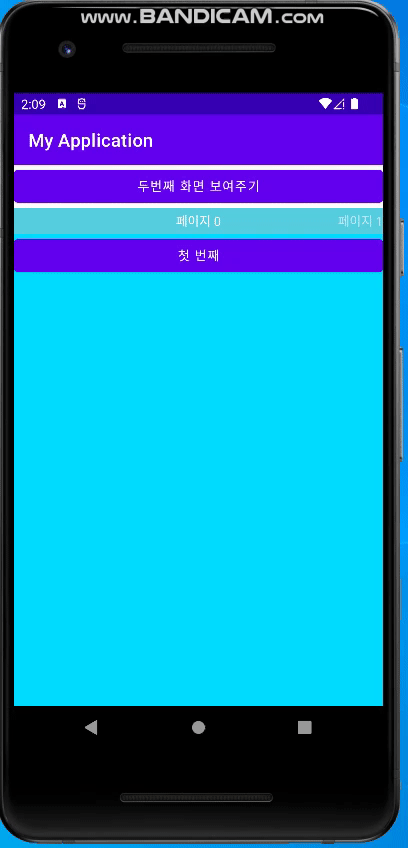
android:text="두번째 화면 보여주기" />
<androidx.viewpager.widget.ViewPager
android:id="@+id/pager"
android:layout_width="match_parent"
android:layout_height="match_parent">
<androidx.viewpager.widget.PagerTitleStrip
android:layout_width="match_parent"
android:layout_height="wrap_content"
android:layout_gravity="top"
android:background="#55cedf"
android:textColor="#FFFFFF"
android:paddingTop="5dp"
android:paddingBottom="5dp">
</androidx.viewpager.widget.PagerTitleStrip>
</androidx.viewpager.widget.ViewPager>
</LinearLayout>
위의 xml 파일에서 TitleStrip이란 전체 아이템의 개수와 현재 보고 있는 아이템을 보여줄 때 사용한다.
layout_gravity 속성 값이 top으로 되어 있어 뷰페이저 위쪽에 보이게 된다.
그 후 프레그먼트 파일 1,2,3을 준비한다.
fragment.xml
1
2
3
4
5
6
7
8
9
10
11
12
13
14
15
<?xml version="1.0" encoding="utf-8"?>
<LinearLayout xmlns:android="http://schemas.android.com/apk/res/android"
    xmlns:tools="http://schemas.android.com/tools"
    android:layout_width="match_parent"
    android:layout_height="match_parent"
    android:background="@android:color/holo_blue_bright"
    android:orientation="vertical"
    tools:context=".Fragment1">

    <Button
        android:id="@+id/button"
        android:layout_width="match_parent"
        android:layout_height="wrap_content"
        android:text="첫 번째" />
</LinearLayout>
Fragment.java
1
2
3
4
5
6
7
8
public class Fragment1 extends Fragment {

    @Override
    public View onCreateView(LayoutInflater inflater, ViewGroup container, Bundle savedInstanceState) {
        return inflater.inflate(R.layout.fragment1, container, false);
    }

}
그 후 MainActivity.java 파일을 열고 onCreate 메서드 아래쪽에 어댑터 클래스를 추가한다.
MainActivity.java
1
2
3
4
5
6
7
8
9
10
11
12
13
14
15
16
17
18
19
20
21
22
23
24
25
26
27
28
29
30
31
32
33
34
35
36
37
38
39
40
41
42
43
44
45
46
47
48
49
50
51
52
53
54
55
56
57
58
59
60
61
62
63
64
65
66
67
68
69
70
71
72
73
74
75
76
77
78
79
package org.techtown.myapplication;

import android.os.Bundle;
import android.view.View;
import android.widget.Button;
import androidx.appcompat.app.AppCompatActivity;
import androidx.fragment.app.Fragment;
import androidx.fragment.app.FragmentManager;
import androidx.fragment.app.FragmentStatePagerAdapter;
import androidx.viewpager.widget.ViewPager;


import java.util.ArrayList;

public class MainActivity extends AppCompatActivity {
    ViewPager pager;

    @Override
    protected void onCreate(Bundle savedInstanceState) {
        super.onCreate(savedInstanceState);
        setContentView(R.layout.activity_main);

        pager = findViewById(R.id.pager);
        pager.setOffscreenPageLimit(3);

        MyPagerAdapter adapter = new MyPagerAdapter(getSupportFragmentManager());

        Fragment1 fragment1 = new Fragment1();
        adapter.addItem(fragment1);

        Fragment2 fragment2 = new Fragment2();
        adapter.addItem(fragment2);

        Fragment3 fragment3 = new Fragment3();
        adapter.addItem(fragment3);

        pager.setAdapter(adapter);

        Button button = findViewById(R.id.button);
        button.setOnClickListener(new View.OnClickListener() {
            @Override
            public void onClick(View view) {
                pager.setCurrentItem(1);
            }
        });

    }


    class MyPagerAdapter extends FragmentStatePagerAdapter {
        ArrayList<Fragment> items = new ArrayList<Fragment>();

        public MyPagerAdapter(FragmentManager fm) {
            super(fm);
        }

        public void addItem(Fragment item) {
            items.add(item);
        }

        @Override
        public Fragment getItem(int position) {
            return items.get(position);
        }

        @Override
        public int getCount() {
            return items.size();
        }

        @Override
        public CharSequence getPageTitle(int position) {
            return "페이지 " + position;
        }

    }

}
MyPagerAdapter는 내부 클래스로 만들었으며 FragmentStatePagerAdapter를 상속했다.
어댑터는 뷰 페이저에 보여줄 각 프래그먼트를 관리하는 역할을 하며,
뷰 페이저에 설정하면 서로 상호작용 하면서 화면을 보여주게 된다.
뷰페이저는 어댑터가 가지고 있는 아이템 중에서 몇개를 로딩해 두었다가 스크롤 할 때 빠르게 보여줄 수 있다.
이 값이 처음에 3보다 적기 때문에,
setOffscreenPageLimit 메서드로 미리 로딩해 놓을 아이템의 개수를 세개로 늘렸다.
코드로 화면을 전환 시키고 싶으면 뷰페이저 객체의 setCurrentItem 메서드를 사용하면 된다.
결과