바로가기 메뉴
바로가기 메뉴는 화면의 좌측 상단에 위치한 햄버거 모양 아이콘을 눌렀을 때 나타나는 화면을 말한다.
웹이나 앱에서 자주 사용하는 기능이며, 안드로이드에서 NavigationDrawer라고 부른다.
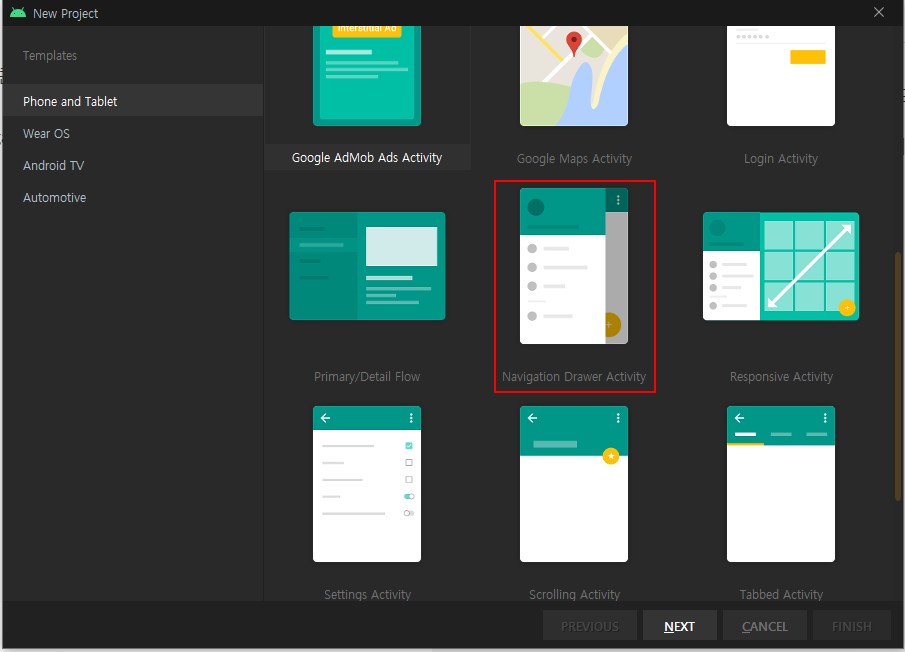
만들기
Navigation Drawer Activity로 새로운 프로젝트를 만든다.
그 다음 프로젝트를 생성하면 activity_main.xml, app_bar_main.xml, content_main.xml 파일이
분리되어 있는데 합쳐 주자.
activity_main.xml
1
2
3
4
5
6
7
8
9
10
11
12
13
14
15
16
17
18
19
20
21
22
23
24
25
26
27
28
29
30
31
32
33
34
35
36
37
38
39
40
41
42
43
44
45
46
47
48
49
<?xml version="1.0" encoding="utf-8"?>
<androidx.drawerlayout.widget.DrawerLayout xmlns:android="http://schemas.android.com/apk/res/android"
    xmlns:app="http://schemas.android.com/apk/res-auto"
    xmlns:tools="http://schemas.android.com/tools"
    android:id="@+id/drawer_layout"
    android:layout_width="match_parent"
    android:layout_height="match_parent"
    android:fitsSystemWindows="true"
    tools:openDrawer="start">

    <androidx.coordinatorlayout.widget.CoordinatorLayout xmlns:android="http://schemas.android.com/apk/res/android"
        xmlns:app="http://schemas.android.com/apk/res-auto"
        xmlns:tools="http://schemas.android.com/tools"
        android:layout_width="match_parent"
        android:layout_height="match_parent"
        tools:context=".MainActivity">

        <com.google.android.material.appbar.AppBarLayout
            android:layout_width="match_parent"
            android:layout_height="wrap_content"
            android:theme="@style/Theme.SampleDrawer.AppBarOverlay">

            <androidx.appcompat.widget.Toolbar
                android:id="@+id/toolbar"
                android:layout_width="match_parent"
                android:layout_height="?attr/actionBarSize"
                android:background="?attr/colorPrimary"
                app:popupTheme="@style/Theme.SampleDrawer.PopupOverlay" />

        </com.google.android.material.appbar.AppBarLayout>

        <FrameLayout
            android:layout_width="match_parent"
            android:layout_height="match_parent"
            app:layout_behavior="@string/appbar_scrolling_view_behavior">

        </FrameLayout>
    </androidx.coordinatorlayout.widget.CoordinatorLayout>

    <com.google.android.material.navigation.NavigationView
        android:id="@+id/nav_view"
        android:layout_width="wrap_content"
        android:layout_height="match_parent"
        android:layout_gravity="start"
        android:fitsSystemWindows="true"
        app:headerLayout="@layout/nav_header_main"
        app:menu="@menu/activity_main_drawer" />

</androidx.drawerlayout.widget.DrawerLayout>
appbar_scrolling_view_behavior는 CoordinatorLayout 안에서 해당 레이아웃이 스크롤 등의 작업이
진행될 때 차지할 면적을 자동으로 계산한다.
또 NavigationView 안에 headerLayout 속성은 바로가기 메뉴의 상단에 표시되면서 사용자
프로필 등을 보여줄 수 있도록 하고 menu 속성은 그 아래에 메뉴를 보여주도록 하는 역할을 한다.
인제 Fragment 1,2,3 파일을 만들어 준다.
Fragment 1.java
1
2
3
4
5
6
7
8
public class Fragment1 extends Fragment {

    @Override
    public View onCreateView(LayoutInflater inflater, ViewGroup container, Bundle savedInstanceState) {
        return inflater.inflate(R.layout.fragment1, container, false);
    }

}
fragment1.xml
1
2
3
4
5
6
7
8
9
10
11
12
13
14
15
<?xml version="1.0" encoding="utf-8"?>
<LinearLayout xmlns:android="http://schemas.android.com/apk/res/android"
    xmlns:tools="http://schemas.android.com/tools"
    android:layout_width="match_parent"
    android:layout_height="match_parent"
    android:background="@android:color/holo_blue_bright"
    android:orientation="vertical"
    tools:context=".Fragment1">

    <Button
        android:id="@+id/button"
        android:layout_width="match_parent"
        android:layout_height="wrap_content"
        android:text="첫 번째" />
</LinearLayout>
MainActivity.java
1
2
3
4
5
6
7
8
9
10
11
12
13
14
15
16
17
18
19
20
21
22
23
24
25
26
27
28
29
30
31
32
33
34
35
36
37
38
39
40
41
42
43
44
45
46
47
48
49
50
51
52
53
54
55
56
57
58
59
60
61
62
63
64
65
66
67
68
69
70
71
72
73
74
75
76
77
78
79
80
81
82
83
84
85
86
87
88
89
90
91
92
93
94
95
import android.os.Bundle;
import android.view.MenuItem;
import android.widget.Toast;
import androidx.appcompat.widget.Toolbar;
import androidx.appcompat.app.ActionBarDrawerToggle;
import androidx.appcompat.app.AppCompatActivity;
import androidx.core.view.GravityCompat;
import androidx.drawerlayout.widget.DrawerLayout;
import androidx.fragment.app.Fragment;

import com.google.android.material.navigation.NavigationView;
import org.techtown.drawer.R;


public class MainActivity extends AppCompatActivity implements NavigationView.OnNavigationItemSelectedListener, FragmentCallback{

    Fragment1 fragment1;
    Fragment2 fragment2;
    Fragment3 fragment3;

    DrawerLayout drawer;
    Toolbar toolbar;

    @Override
    protected void onCreate(Bundle savedInstanceState) {
        super.onCreate(savedInstanceState);
        setContentView(R.layout.activity_main);

        toolbar = findViewById(R.id.toolbar);
        setSupportActionBar(toolbar);

        drawer = findViewById(R.id.drawer_layout);
        ActionBarDrawerToggle toggle = new ActionBarDrawerToggle(
                this,drawer,toolbar,R.string.navigation_drawer_open,R.string.navigation_drawer_close);
        drawer.addDrawerListener(toggle);
        toggle.syncState();	// 현재 Drawerlayout 상태와 ActionBarDrawerToggle 의 상태를 sync

        NavigationView navigationView = findViewById(R.id.nav_view);
        navigationView.setNavigationItemSelectedListener(this);

        fragment1 = new Fragment1();
        fragment2 = new Fragment2();
        fragment3 = new Fragment3();

        getSupportFragmentManager().beginTransaction().add(R.id.container,fragment1).commit();
    }

    @Override
    public void onBackPressed(){
        if (drawer.isDrawerOpen(GravityCompat.START))
            drawer.closeDrawer(GravityCompat.START);
        else
            super.onBackPressed();
    }

    @Override
    public boolean onNavigationItemSelected(MenuItem item){
        int id = item.getItemId();

        switch(id){
            case R.id.menu1:
                Toast.makeText(this,"첫 번째 메뉴 선택됨", Toast.LENGTH_LONG).show();
                onFragmentSelected(0,null); break;
            case R.id.menu2:
                Toast.makeText(this,"두 번째 메뉴 선택됨", Toast.LENGTH_LONG).show();
                onFragmentSelected(1,null); break;
            case R.id.menu3:
                Toast.makeText(this,"세 번째 메뉴 선택됨", Toast.LENGTH_LONG).show();
                onFragmentSelected(2,null); break;
        }
        drawer.closeDrawer(GravityCompat.START);

        return true;
    }

    @Override
    public void onFragmentSelected(int position, Bundle bundle){
        Fragment curFragment = null;

        switch(position){
            case 0:
                curFragment = fragment1;
                toolbar.setTitle("첫 번째 화면");
            case 1:
                curFragment = fragment2;
                toolbar.setTitle("두 번째 화면");
            case 2:
                curFragment = fragment3;
                toolbar.setTitle("세 번째 화면");
        }

        getSupportFragmentManager().beginTransaction().replace(R.id.container,curFragment).commit();
    }
}
FragmentCallback.java
1
2
3
4
5
import android.os.Bundle;

public interface FragmentCallback {
    public void onFragmentSelected(int position, Bundle bundle);
}
결과