
레이아웃의 종류
| 레이아웃 이름 | 설명 |
|---|---|
| 제약 레이아웃 (ConstarintLayout) | 제약 조건 기반 모델 연결선을 제약 조건으로 하여 화면을 구성하는 방법 안드로이드 스튜디오에서 자동으로 설정하는 디폴트 레이아웃 |
| 리니어 레이아웃 (LinearLayout) | 박스 모델(BOX) 한 쪽 방향으로 차례대로 뷰를 추가하며 화면을 구성하는 방법 뷰가 차지할 수 있는 사각형 영역을 할당 |
| 상대 레이아웃 (RelativeLayout) | 규칙(Rule) 기반 모델 부모 컨테이너나 다른 뷰와의 상대적 위치로 화면을 구성하는 방법 권장하지 않음 |
| 프레임 레이아웃 (ConstarintLayout) | 싱글(Single)모델 가장 상위에 있는 하나의 뷰 또는 뷰 그룹만 보여주는 방법 여러개의 뷰가 중첩하여 쌓게 됨 가장 단순하지만 여러개의 뷰를 중첩한 후 각 뷰를 전환하여 보여주는 방식 |
대표적인 레이아웃
제약 레이아웃
리니어 레이아웃
상대 레이아웃
프레임 레이아웃
테이블 레이아웃
스크롤 뷰란?
하나의 뷰나 뷰 그룹을 넣을 수 있고 어떤 뷰의 내용물이 넘치면 스크롤을 만들 수 있게 도와준다.
예를 들어 스크롤뷰에 넣은 뷰 안에 글자를 넣었을 때 그 글자가 많아서
화면을 벗어나면 자동으로 스크롤이 만들어 진다.
스크롤 뷰 사용하기
1
2
3
4
5
6
7
8
9
10
11
12
13
14
15
16
17
18
19
20
21
22
23
24
25
26
27
28
29
30
31
32
33
34
35
36
37
38
39
40
41
42
43
44
public class MainActivity extends AppCompatActivity {
    ScrollView scrollView;
    ImageView imageView;
    BitmapDrawable bitmap;
    int imageIdx = 0;

    @Override
    protected void onCreate(Bundle savedInstanceState) {
        super.onCreate(savedInstanceState);
        setContentView(R.layout.activity_main);

        scrollView = findViewById(R.id.scrollView);     // 레이아웃에 정의된 뷰 객체 참조
        imageView = findViewById(R.id.imageView);        // 레이아웃에 정의된 뷰 객체 참조
        scrollView.setHorizontalScrollBarEnabled(true);     // 수평 스크롤바 사용 긴으 설정

        /* 리소스 이미지 참조 */
        Resources res = getResources();
        bitmap = (BitmapDrawable) res.getDrawable(R.drawable.one);
        int bitmapWidth = bitmap.getIntrinsicWidth();
        int bitmapHeight = bitmap.getIntrinsicHeight();

        /* 이미지 리소스와 이미지 크기 설정  */
        imageView.setImageDrawable(bitmap);
        imageView.getLayoutParams().width = bitmapWidth;
        imageView.getLayoutParams().height = bitmapHeight;

    }

    public void onButton1Clicked(View v) {        // 버튼이 클릭했을때 발생하는 이벤트
        changeImage();
    }

    /* 다른 이미지 리소스로 변경 */
    private void changeImage() {
        Resources res = getResources();     // 현재 패키지에 있는 디렉토리 정보를 다 가져오는듯
        bitmap = (BitmapDrawable) res.getDrawable(R.drawable.two);      // Drawable 디렉토리에 two 파일을 가져와서 객체에 저장하는듯 ?
        int bitmapWidth = bitmap.getIntrinsicWidth();               // 사진의 크기를 가져옴
        int bitmapHeight = bitmap.getIntrinsicHeight();

        imageView.setImageDrawable(bitmap);                 // 위에서 가져온 이미지를 보여줌
        imageView.getLayoutParams().width=bitmapWidth;      // 현재 레이아웃 요소의 속성객체를 얻어와서 width값 설정
        imageView.getLayoutParams().height=bitmapHeight;       // 현재 레이아웃 요소의 속성객체를 얻어와서 hegiht 값 설정 ㄴ
    }
}
1
2
3
4
5
6
7
8
9
10
11
12
13
14
15
16
17
18
19
20
21
22
23
24
25
26
27
28
29
30
31
32
33
34
35
36
37
38

<?xml version="1.0" encoding="utf-8"?>
<LinearLayout xmlns:android="http://schemas.android.com/apk/res/android"
    xmlns:app="http://schemas.android.com/apk/res-auto"
    android:layout_width="match_parent"
    android:layout_height="match_parent"
    android:orientation="vertical">

    <Button
        android:id="@+id/button"
        android:onClick="onButton1Clicked"
        android:layout_width="wrap_content"
        android:layout_height="wrap_content"
        android:layout_gravity="center"
        android:text="이미지 바꾸어 보여주기" />

    <HorizontalScrollView
        android:id="@+id/horScrollView"
        android:layout_width="match_parent"
        android:layout_height="match_parent" >

        <ScrollView
            android:id="@+id/scrollView"
            android:layout_width="match_parent"
            android:layout_height="match_parent">

            <ImageView
                android:id="@+id/imageView"
                android:layout_width="match_parent"
                android:layout_height="wrap_content"
                app:srcCompat="@drawable/one" />
        </ScrollView>

    </HorizontalScrollView>

</LinearLayout>
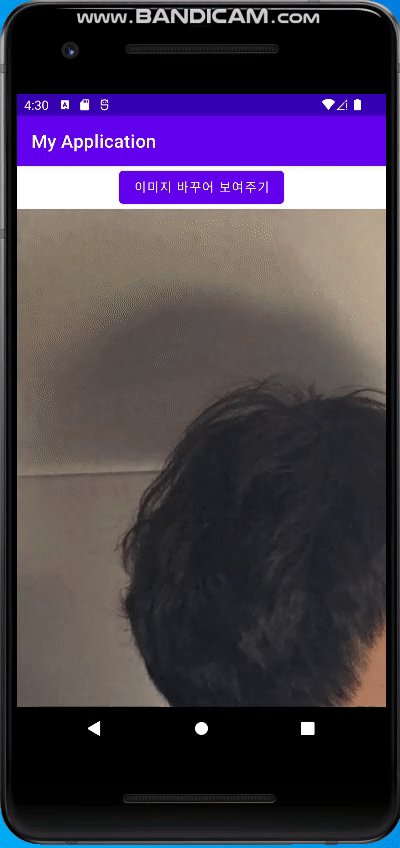
결과
res/drawable 에 있는 이미지를 bitmap으로 가져오기
프로젝트에 추가된 이미지들을 getDrawable 메서들 이용해 BitmapDrawable 객체로 만든다.