
액션바 사용하기
옵션메뉴는 액션바에 포함되어 보이도록 만들어져 있다.
액션바는 액의 제목(Title)이 보이는 위쪽 부분을 말한다.
옵션 메뉴와 컨텍스트 메뉴는 각각의 액티비티마다 설정할 수 있으므로 액티비티에
추가하고 싶은 경우에는 다음이 두 메서드를 다시 정의하여 메뉴 아이템을 추가할 수 있다.
1
2
3
public boolean onCreateOptionsMenu (Menu menu)
pulbic void onCreateContextMenu (ContextMenu menu, View v,
								 ContextMenu.ContextMenuInfo menuInfo)
이 두개의 메서드를 보면 Menu나 ContextMenu 객체가 전달되는 것을 알 수 있다.
이 객체의 add 메서드를 사용해서 메뉴 아이템을 추가해야한다.
대표적인 add 메서드는 아래와 같다.
1
2
3
MenuItem add (int groupId, int order, CharSequence title)
MenuItem add (int groupId, int order, int titleRes)
SubMenu addSubMenu(int titleRes)
grupId: 아이템을 하나의 그룹으로 묶을 때 사용
itemId: 아이템이 갖는 고유 ID 값
아이템이 많아서 서브 메뉴를 추가하고 싶을 때는 addSubMenu 메서드를 사용한다.
하지만 이렇게 코드에서 메뉴를 추가하는 것 보다는 XML에서 메뉴의 속성을 정의한 후
객체로 로딩하여 참조하는 것이 더 간단하다.
메뉴 기능 예제
/app/res 폴더 오른쪽 마우스 -> New Directory -> menu 폴더 생성
/app/res/menu 폴더를 선택한 상태에서 마우스 오른쪽 버튼 -> New Menu resouce file
그 후 아래와 같이 xml 파일을 수정한다.
1
2
3
4
5
6
7
8
9
10
11
12
13
14
15
16
17
18
19
20
21
22
23

<?xml version="1.0" encoding="utf-8"?>
<menu xmlns:android="http://schemas.android.com/apk/res/android"
    xmlns:app="http://schemas.android.com/apk/res-auto">

    <item android:id ="@+id/menu_refresh"
        android:title="새로고침"
        android:icon="@drawable/menu_refresh"
        app:showAsAction="always" />

    <item android:id = "@+id/menu_search"
        android:title="검색"
        android:icon="@drawable/menu_search"
        app:showAsAction="always"
        />

    <item android:id = "@+id/menu_settings"
        android:title="설정"
        android:icon="@drawable/menu_settings"
        app:showAsAction="always"
        />

</menu>
item 태그는 하나의 메뉴에 대한 정보를 담고 있고,
showAsAction 속성은 이 메뉴를 항상 보이게 할 것인지 아닌지를 설정하는 것이다.
아래는 showAsAction 속성 값을 정리한 것이다.
showAsAction 속성에 설정할 수 있는 값
| showAsAction 속성 값 | 설 명 |
|---|---|
| always | 항상 액션 바에 아이템을 추가하여 표시한다. |
| never | 액션바에 아이템을 추가하여 표시하지 않는다. (디폴트) |
| ifRoom | 액션바에 여유 공간이 있을 때만 아이템을 표시한다. |
| withText | title 속성으로 설정된 제목을 같이 표시한다. |
| collapseActionView | 아이템에 설정한 뷰의(actionView Layout)의 아이콘만 표시한다. |
이렇게 정의한 메뉴들은 MainActivity.java에 정의된 onCreateOptionsMenu 메서드는
액티비티가 만들어질 때 미리 자동 호출되어 화면에 메뉴 기능을 추가할 수 있도록 한다.
인제 MainActivity.java 파일을 수정해 보자.
MainActivity.java
1
2
3
4
5
6
7
8
9
10
11
12
13
14
15
16
17
18
19
20
21
22
23
24
25
26
27
28
29
30
31
public class MainActivity extends AppCompatActivity {

    @Override
    protected void onCreate(Bundle savedInstanceState) {
        super.onCreate(savedInstanceState);
        setContentView(R.layout.activity_main);
    }

    @Override
    public boolean onCreateOptionsMenu(Menu menu){
        getMenuInflater().inflate(R.menu.menu_main, menu);
        return true;
    }

    @Override
    public boolean onOptionsItemSelected(MenuItem item){
        int curId = item.getItemId();

        switch(curId){
            case R.id.menu_refresh:
                Toast.makeText(this,"새로고침 메뉴가 선택 되었습니다.",Toast.LENGTH_SHORT).show();
                break;
            case R.id.menu_search:
                Toast.makeText(this, "검색 메뉴가 선택 되었습니다.", Toast.LENGTH_SHORT).show();
                break;
            case R.id.menu_settings:
                Toast.makeText(this,"설정 메뉴가 선택 되었습니다.", Toast.LENGTH_SHORT).show();
        }
        return super.onOptionsItemSelected(item);
    }
}
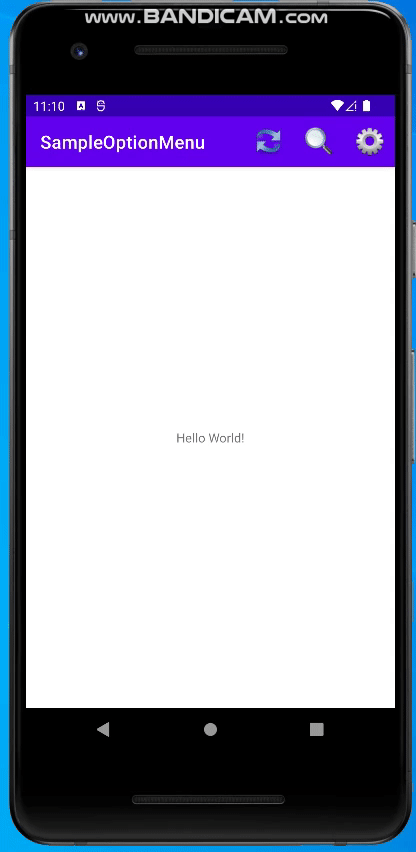
결과
액션바 좀 더 살펴보기
액티비티 위쪽에 보이는 타이틀 부분과 옵션 메뉴는 액션바로 합쳐져 보이게 된다.
먼저 액션바는 기본적으로 제목을 보여주는 타이틀의 기능을 해서 앱의 제목을 보여줄 수 있고,
화면에 보이거나 보이지 않도록 만들 수 있다.
소스 코드에서 액션바를 보이게 만들고 싶아면 다음 코드처럼 show 메서드를 호출하고
감추고 싶다면 hide 메서드를 호출하면 된다.
1
2
3
ActionBar abar = getActionBar();
abar.show()
abar.hide()
검색 기능 추가
MainActivity.java
1
2
3
4
5
6
7
8
9
10
11
12
13
14
15
16
17
18
19
20
21
22
23
24
25
26
27
28
29
30
31
32
33
34
public class MainActivity extends AppCompatActivity {

    @Override
    protected void onCreate(Bundle savedInstanceState) {
        super.onCreate(savedInstanceState);
        setContentView(R.layout.activity_main);
    }

    public boolean onCreateOptionsMenu(Menu menu) {
        /* XML로 정의된 메뉴 정보를 인플레이션 하여 메모리에 로딩*/
        getMenuInflater().inflate(R.menu.menu_main, menu);

	    /* 메뉴 아이템 중에서 검색을 위해 정의한 이템을 뷰 객체로 참조*/
        View v = menu.findItem(R.id.menu_search).getActionView();

        if (v != null) {
	        /*검색을 위한 메뉴 아이템 안에 정의한 입력상자 객체 참조  */
            EditText editText = v.findViewById(R.id.editText);

            if (editText != null) {
	            /* 입력 상자에 객체 리스너 설정 */
                editText.setOnEditorActionListener(new TextView.OnEditorActionListener() {
                    @Override
                    public boolean onEditorAction(TextView v, int actionId, KeyEvent event) {
                        Toast.makeText(getApplicationContext(), "입력됨.", Toast.LENGTH_LONG).show();
                        return true;
                    }
                });
            }
        }

        return true;
    }
}
avtivity_main.xml
1
2
3
4
5
6
7
8
9
10
11
12
13
14
15
16
17
18
<?xml version="1.0" encoding="utf-8"?>
<androidx.constraintlayout.widget.ConstraintLayout xmlns:android="http://schemas.android.com/apk/res/android"
    xmlns:app="http://schemas.android.com/apk/res-auto"
    xmlns:tools="http://schemas.android.com/tools"
    android:layout_width="match_parent"
    android:layout_height="match_parent"
    tools:context=".MainActivity">

    <TextView
        android:layout_width="wrap_content"
        android:layout_height="wrap_content"
        android:text="Hello World!"
        app:layout_constraintBottom_toBottomOf="parent"
        app:layout_constraintLeft_toLeftOf="parent"
        app:layout_constraintRight_toRightOf="parent"
        app:layout_constraintTop_toTopOf="parent" />

</androidx.constraintlayout.widget.ConstraintLayout>
search_layout.xml
1
2
3
4
5
6
7
8
9
10
11
12
13
14
15
16
17
18
19
20
21
22
23
<?xml version="1.0" encoding="utf-8"?>
<LinearLayout xmlns:android="http://schemas.android.com/apk/res/android"
    android:layout_width="wrap_content"
    android:layout_height="wrap_content"
    android:orientation="horizontal">

    <TextView
        android:layout_width="wrap_content"
        android:layout_height="wrap_content"
        android:text="검색 :"
        android:textColor="#ffad8745"
        android:textSize="16sp" />

    <EditText
        android:id="@+id/editText"
        android:layout_width="100dp"
        android:layout_height="wrap_content"
        android:layout_marginLeft="4dp"
        android:imeActionId="1337"
        android:imeOptions="actionDone"
        android:inputType="text" />

</LinearLayout>
menu_main.xml
1
2
3
4
5
6
7
8
9
10
11
12
13
14
15
16
17
18
19
20
21
22
<?xml version="1.0" encoding="utf-8"?>
<menu xmlns:android="http://schemas.android.com/apk/res/android"
    xmlns:app="http://schemas.android.com/apk/res-auto">

    <item
        android:id="@+id/menu_refresh"
        android:icon="@drawable/menu_refresh"
        android:title="새로고침"
        app:showAsAction="always" />
    <item
        android:id="@+id/menu_settings"
        android:icon="@drawable/menu_settings"
        android:title="설정"
        app:showAsAction="always" />
    <item
        android:id="@+id/menu_search"
        android:orderInCategory="102"
        android:title="검색"
        app:actionLayout="@layout/search_layout"
        app:showAsAction="always|withText" />

</menu>
결과
